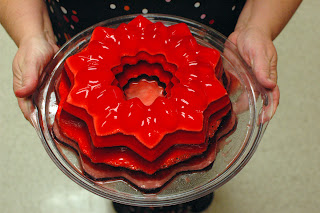
I made a fun jello dessert for the party. It was a hit. I usually make it in the colors of the rainbow (ROYGBIV), but wanted to stay with the party colors. Although I used
many colors and flavors of jello, it was more monotone than I had expected.
Here's the recipe from another blog.
(I am reposting it here since it is from 2007 and I worry that the link will go dead soon.)
Rainbow Jello Dessert
via: Tip Junkie via Rachel Perlow on the EGullet forums.
Plan on it taking about 3 hours to make, the day before you need it. It only takes a few minutes every 20 minutes or so, but you can't let a layer set for hours before adding the next one, or you risk the layers sliding apart after unmolding. Ideally, you want the finished mold to set up at least over night. However, I made it that morning and it was finished 5 hours before the party. It was still fine and unmolded perfectly.
People ask what it tastes like. It tastes like Jell-O. Since you are eating many flavors at once, it's hard to differentiate, so it doesn't matter which flavor of red you choose, except that Watermelon is too light in color and Black Cherry is too dark. The kids, along with some adults, like to eat it layer by layer. It is really kind of fun.
Begin with the color that you want to show at the top of your mold. Be thoughtful about what colors you will end with since the bundt pan flares towards the bottom you will need to make double batches of the last few colors. If you don't do that, the layers will be very thin. You don't have to use Jell-O brand gelatin. If you can't find all the colors you need in one brand, it doesn't really matter if you substitute a store brand . If you want to get fancy, you can use unflavored/unsweetened gelatin and make your own flavors with juice, but the colors will be hard to achieve without a lot of food coloring, so I just go with the boxed stuff.
The original recipe calls for 3 Tbs yogurt for each layer, I go with 2 Tbs, or really just a big soup spoonful, otherwise the creamy layers are too pale. I use the regular Cool Whip. The Extra Thick Cool Whip does not mix in as easily as the usual stuff.
Recipe:
8 x 3/4 c Boiling Water
7 pkg flavored Gelatin, 1 each of the 6 different colors of the rainbow, plus one extra, either red or purple* (I used 5 colors)
1-1/4 c Vanilla Yogurt (smooth and creamy works best), or sour cream, or cool whip (I used Cool Whip)
Whipped Topping or Cream for service (optional)
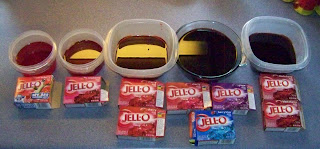
Line up your boxes of gelatin in rainbow order (remember ROY G BIV?), next to 5 large cups, and one quart sized bowl. Put each flavor of gelatin in its own bowl or cup, use the larger one for the double batch.
Stir 1.1/4 cups boiling water into each flavor at least 2 minutes until completely dissolved (do one at a time, to make sure each is completely dissolved), use 2.5 cups for the double batch.
Lightly spray a 10 cup Bundt pan with cooking spray, wipe out excess with a paper towel. Beginning with your first color, pour 3/4 cup of the dissolved gelatin into the bundt pan. Refrigerate about 15-20 minutes or until set but not firm (gelatin should feel tacky and stick to finger when touched).
Meanwhile, stir 2 Tbsp. of the yogurt or Cool Whip into the 1/2 cup of dissolved gelatin remaining in the cup, use a small whisk or fork to get out all the lumps. Refrigerate this remaining gelatin about 5 minutes or until slightly thickened (consistency of unbeaten egg whites). Leave the rest of the flavors at room temperature, lightly covered with plastic wrap.
Spoon the creamy gelatin over the set, but still tacky gelatin in pan. Refrigerate about 10-15 minutes or until gelatin is set but not firm (gelatin should stick to finger when touched).
Repeat this with each remaining gelatin flavor. If the gelatin waiting to be used sets at room temperature, fill a bowl the cup will fit into with hot water and stir to loosen it up again. Refrigerate gelatin as directed to create a total of 12 alternating clear and creamy gelatin layers. See tips below.
Refrigerate overnight until firm. Unmold. Garnish servings with whipped cream (optional).
TIPS FOR SUCCESS:
When making all the gelatin at once, instead of using bowls, the gelatin can be made in large, individual, plastic cups (facilitates cleanup). Mark each cup with its flavor and line the cups up in the order they are going into the mold. Put each color of gelatin in its own cup. This saves having to reboil water every 1/2 hour. Leave the gelatin waiting to be layered on the counter, at room temperature, lightly covered with plastic wrap.
Mold type and size: This is a versatile recipe, and special molds aren't needed, but a bundt cake pan makes a beautiful mold. To calculate the mold's volume, fill it with water to measure it. Plan on 1-2/3 cup of gelatin per box. For a 10-cup mold, seven boxes of gelatin work well. If you are using a smaller mold, use less of each flavor, fewer colors, or make a second "sampler" serving. Even for a large mold, making a small sampler in a clear glass will hit the spot after taking 3 hours to make this and not being able to have any until the next day.
O
rder: For a nice look the colors of the rainbow (red, orange, yellow, green, blue, violet) are most commonly used, but variations can be beautiful. For example, school colors for a school banquet or bake sale, or colors appropriate to a holiday, i.e. red and green at Christmas.
Setting: To set properly, the gelatin must be cold and not warm when it is put in the mold. It is also important that the layers are tacky to the touch and not solidly firm, as each successive layer is added. Otherwise the layers may not stick to each other. To prevent the layers from cracking as each layer is added, pour the gelatin over a spoon to break the fall, close down to the set gelatin. Each time the mold is put into the refrigerator to set, give it a quarter turn. This will keep the layers even. It takes less time for each progressive layer to set.
Unmolding: For best results, unmold just before serving. Fill a larger container or clean sink with warm water, not too hot (otherwise it will melt). Rub a few drops of water onto the serving plate, this will facilitate adjusting the mold after unmolding, if necessary. Either use a plate with a large lip and just a little bit bigger than the diameter of the mold, or use a larger platter, at least 2-3 inches larger than the mold, because it will spread when unmolded and cut. Dip the mold almost to the edge into the warm water for just a few seconds. Wipe off with a towel and check the edges to see if they are loose, if not, repeat the dip for just a few seconds. Invert serving plate on top and flip quickly. Having a spotter brings peace of mind!